-
Shop
- Advanced Technologies
- AI Skills for Creators & Freelancers
- AI Client Management
- AI Ethics
- AI Mindset
- AI Tools & Prompts
- AI Writing & Content Creation
- Audio, Voice & Music
- Design & Visual Creation
- Email, Messaging & Communication
- Freelancing & Business
- Marketing, Ads & Conversion
- Productivity, Workflow & Automation
- SEO & Search Optimization
- Social Media Content & Growth
- Strategy, Planning & Analytics
- Video Creation & Editing
- AI Skills Mastery 2026 Collection
- Bathroom
- Best-Sellers
- Car Accessories
- Confidence
- Dating & Social Skills
- Digital Resources
- Easter Products
- Education & Learning
- Family & Parenting
- Fashion
- Fashion Accessories
- Furniture
- Gadgets
- Health & Beauty
- Health & Wellness
- Home & Garden
- Home Electronics
- Home Supplies
- Jewelry
- Kids & Babies
- Kitchen
- Lighting
- Patio, Lawn & Garden
- Personal Growth
- Pet Care
- Pet Supplies
- Pets
- Shoes
- Smart Home Living Guides
- Sport & Outdoors
- Stress Relief & Relaxation
- Super Deals
- TikTok Growth & Monetization Mastery
- Travel
- Travel & Adventure
- Wealth
- Wellness
Inflatable Oxford Cloth Tent for Car Camping: Fast & Tough
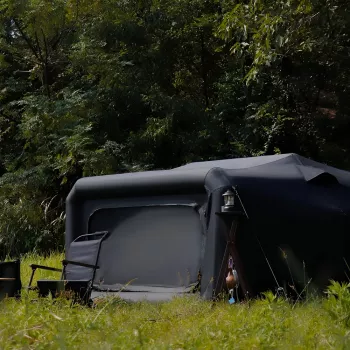
Inflatable Oxford Cloth Camping Tent: Comfort, Stability, and Fast Setup for Car Camping
An inflatable camping tent built with Oxford cloth is designed for quick pitching, reliable weather protection, and a roomier feel than many pole tents. Instead of managing long pole sets, you use air beams to create structure in minutes—ideal for car camping, family weekends, festivals, and base camps. Below is a practical breakdown of how inflatable support works, why Oxford cloth is a go-to for durable camping shelters, what to check before buying, and how to keep your tent performing trip after trip.
What Makes an Inflatable Tent Different
Inflatable tents replace (or significantly reduce) rigid poles by using inflatable tubes—often called air beams—to form the frame. After you stake key points, you inflate the beams with a pump and then tension the shelter with guylines so the fabric sits taut and stable.
One advantage of air beams is how they behave in gusty conditions: they can flex and recover instead of snapping the way some pole segments can. That said, the “secret” to wind performance isn’t magic materials—it’s correct staking angles, using all guy points, and keeping consistent tension across the structure.
Because inflatable tents are usually larger, they tend to pack bigger and weigh more than ultralight backpacking tents. They shine when you’re driving to camp and want speed, space, and a more comfortable interior.
Oxford Cloth: Why It’s Popular for Family-Style Camping
Oxford cloth is a woven fabric known for abrasion resistance, making it a solid choice when you pitch frequently or camp on rougher ground. In real use, the high-wear zones—around zippers, corners, stake loops, and door edges—benefit from a tougher fabric that tolerates repeated handling.
Most Oxford cloth tent bodies and flies rely on coatings (often PU) for water resistance, and seam construction matters just as much as the fabric itself. Look for taped seams, well-finished stitch lines, and a floor design that blocks splashback and seepage.
For multi-day trips where comfort and longevity matter more than shaving ounces, Oxford cloth helps deliver that “home base” feeling: stable walls, a quieter pitch when tensioned correctly, and better everyday durability.
Quick Specs Snapshot
Use this checklist as a quick reality check before purchasing: confirm capacity, footprint needs, weather protection features, and what accessories are included. It’s also worth verifying whether a pump, stakes, guylines, and a repair kit come in the box or need to be picked up separately.
| Feature | What to look for | Why it matters |
|---|---|---|
| Air-beam system | Multiple independent chambers; secure valves | Reduces total failure risk and improves stability |
| Rain protection | Full-coverage fly; taped seams; bathtub floor | Helps prevent leaks during sustained rain |
| Ventilation | High/low vents; mesh panels; fly venting | Reduces condensation and improves comfort |
| Wind readiness | Reinforced guy points; reflective guylines | Keeps structure tensioned in gusty conditions |
| Floor durability | Thicker floor fabric; protective groundsheet option | Prevents punctures and moisture intrusion |
| Repair readiness | Patch kit; spare valve parts if available | Speeds fixes for pinholes or valve issues |
Setup in Real Campsites: A Reliable Routine
1) Prep the site. Clear sharp stones and sticks, and consider a groundsheet to protect the floor and simplify cleanup later. If you’re camping on fragile terrain, follow the Leave No Trace Seven Principles to minimize impact.
2) Anchor first. Stake corners and key points before inflating so the tent rises into the correct shape rather than “walking” as pressure builds.
3) Inflate in stages. Bring the beams up until the shelter holds shape, then walk around and smooth/tension fabric evenly before topping up to final pressure.
4) Guyline discipline. Attach and tension guylines early—especially on larger tents—so wind loads distribute through the whole structure rather than stressing a single side.
5) Final check. Tighten valve caps, run zippers to confirm smooth operation, and verify the fly isn’t pressed hard against inner walls (a common cause of moisture transfer in damp weather).
Weather Performance: Rain, Wind, Heat, and Condensation
Wind: Inflatable beams can be resilient, but stability depends on correct staking and consistent guyline tension. When forecasts look rough, consult the NOAA National Weather Service weather safety guidance and pick a more sheltered pitch.
Condensation: Vent even in cool weather by cracking vents and avoiding wet gear piles inside. Never cook inside a tent; it adds moisture and can create dangerous fumes—review the CDC carbon monoxide poisoning prevention guidance for safe practices.
Comfort and Livability Features That Matter on Multi-Day Trips
Care, Cleaning, and Storage for Long Service Life
When an Inflatable Oxford Cloth Tent Is the Best Fit
Product Options (In Stock)
- Inflatable Oxford Cloth Camping Tent — a ready-to-ship option designed for quick pitching and durable fabric for repeated trips.
- Universal Car Steering Wheel Phone Mount for Safe Navigation — helpful for quick map checks when driving to camp (use only when parked and safely stopped).
- Triple-Sided Ultra-Fine Soft Bristle Toothbrush for Enhanced Oral Health — a compact add-on for keeping a cleaner camp routine.
FAQ
Do inflatable tents handle strong wind well?
They can, because air beams flex and recover, but wind performance depends heavily on correct staking, using every guyline, and choosing a less exposed campsite. Re-check guyline tension and beam pressure when weather shifts.
How long does it take to set up an inflatable camping tent?
Most campers can pitch one in about 5–15 minutes depending on tent size and experience. A smooth routine is: stake key points, inflate beams, then guy out and fine-tension the fabric.
What should be done if an air beam gets a small leak?
Locate the leak with soapy water, patch it with the included repair kit, and let it cure fully before reinflating to normal pressure. Many designs use separate chambers, so a small leak is often manageable while you complete a proper repair.
Recommended for you


Was this article helpful?
Yes
No







Leave a comment