-
Shop
- Advanced Technologies
- AI Skills for Creators & Freelancers
- AI Client Management
- AI Ethics
- AI Mindset
- AI Tools & Prompts
- AI Writing & Content Creation
- Audio, Voice & Music
- Design & Visual Creation
- Email, Messaging & Communication
- Freelancing & Business
- Marketing, Ads & Conversion
- Productivity, Workflow & Automation
- SEO & Search Optimization
- Social Media Content & Growth
- Strategy, Planning & Analytics
- Video Creation & Editing
- AI Skills Mastery 2026 Collection
- Bathroom
- Best-Sellers
- Car Accessories
- Confidence
- Dating & Social Skills
- Digital Resources
- Easter Products
- Education & Learning
- Family & Parenting
- Fashion
- Fashion Accessories
- Furniture
- Gadgets
- Health & Beauty
- Health & Wellness
- Home & Garden
- Home Electronics
- Home Supplies
- Jewelry
- Kids & Babies
- Kitchen
- Lighting
- Patio, Lawn & Garden
- Personal Growth
- Pet Care
- Pet Supplies
- Pets
- Shoes
- Smart Home Living Guides
- Sport & Outdoors
- Stress Relief & Relaxation
- Super Deals
- TikTok Growth & Monetization Mastery
- Travel
- Travel & Adventure
- Wealth
- Wellness
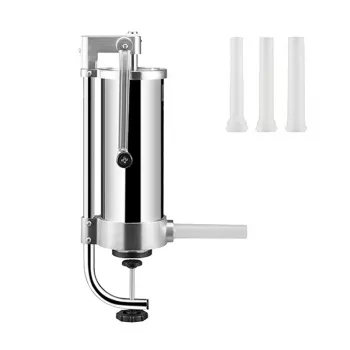
3L Vertical Sausage Stuffer: Easy Stuffing, Clean Links

Vertical Sausage-Making at Home: Why a Vertical Stuffer Makes It Easier
Homemade sausage is at its best when the fill is steady, the casing stays intact, and cleanup doesn’t turn into a second project. Our team built our Vertical Sausage Stuffer with 3L Capacity & 3 Stuffing Tubes for the home kitchen that wants repeatable results—small batches on weeknights, bigger prep sessions on weekends, and the flexibility to move between slim breakfast links and thicker styles using the included tube sizes.
What a Vertical Stuffer Changes (and Why It Matters)
If you’ve tried stuffing with improvised methods, you already know the pain points: inconsistent pressure, torn casings, and a countertop that looks like a meat science experiment. A vertical stuffer tightens up the whole workflow.
- More control over the fill: A steady, vertical feed helps reduce blowouts and uneven pockets compared with makeshift piping setups.
- Cleaner workflow: Your mix stays in the canister instead of getting smeared across bowls, bags, and hands.
- Better texture: Consistent pressure supports a uniform grind structure and a tighter, more even bite.
- Less waste: Controlled filling makes it easier to stop, twist, and portion without overstuffing.
- Batch-friendly capacity: 3L is a practical middle ground—enough to be efficient without being awkward to load, lift, or store.
Capacity and Tube Sizes: Matching the Tool to the Sausage
The 3L canister size is ideal for family-sized batches: big enough to keep you moving, small enough to stay manageable on a home counter. The three included stuffing tubes let you match flow rate to casing size—one of the most reliable ways to prevent tearing and keep links consistent.
For smoother stuffing, keep your meat and parts cold. Cold fat stays firm, feeds more evenly, and helps you avoid smearing (which can lead to a pasty texture).
Quick guide to choosing a stuffing tube
| Tube choice | Best for | Why it helps | Simple handling tip |
|---|---|---|---|
| Small tube | Thin links and smaller casings | Supports a steady fill without stretching delicate casings | Feed slowly and keep casing moving with light tension |
| Medium tube | Everyday fresh sausage links | Balanced flow rate for easy portioning and twisting | Pause between links to twist evenly and avoid overstuffing |
| Large tube | Thicker sausages and larger casings | Moves mix with less restriction for broader fills | Avoid packing the canister too tightly; let the pressure do the work |
A Practical Stuffing Workflow for Better Results
Consistent sausage is less about rushing and more about sequencing. Here’s a simple routine you can repeat batch after batch:
- Prep the mix: Grind and season, then chill the meat so it stays firm and feeds cleanly.
- Load efficiently: Press the mix into the canister to reduce air gaps; fewer gaps means fewer pockets in the final sausage.
- Prime the tube: Run a small amount through before loading the casing to clear air from the path.
- Stuff with steady pressure: Keep the casing moving at the same pace as the fill; the goal is a full but flexible link.
- Portion and twist: Keep twists uniform so links cook evenly and stack neatly for storage.
- Finish smart: Prick visible air pockets with a sterile pin to keep links tight and reduce blowouts during cooking.
Cleaning and Care That Keeps the Stuffer Working Smoothly
Cleaning is where a good stuffer earns its keep—especially if you handle it the right way from the start.
- Clean promptly: Fat and protein set quickly; the sooner you clean, the less scrubbing you do.
- Separate parts for a full wash: Remove the tube(s) and disassemble as intended so you can reach corners where meat can collect.
- Warm water first, then wash: Start with warm (not hot) water to lift fat without baking it on.
- Dry thoroughly: Air-dry completely before storage to help prevent odors and protect parts over time.
- Store tubes together: Keeping accessories in one place prevents mismatches and speeds up your next batch.
Food Safety Essentials for Homemade Sausage
Sausage-making is rewarding, but it’s also hands-on with raw meat—so temperature control and clean surfaces matter. Keep everything cold, avoid cross-contamination, and cook to safe internal temperatures with a thermometer. For reliable guidance, use the USDA’s references on safe temperatures and safe handling: USDA FSIS Safe Minimum Internal Temperature Chart and USDA FSIS Kitchen Companion (Clean, Separate, Cook, Chill).
Who This Stuffer Is a Good Fit For
Product Spotlight: Our Vertical Sausage Stuffer (3L) + 3 Stuffing Tubes
Our Vertical Sausage Stuffer with 3L Capacity & 3 Stuffing Tubes is designed for controlled, repeatable stuffing with a vertical layout that keeps your workflow tidier. The 3L capacity supports efficient batching while staying manageable for home counters and storage, and the three tube sizes help you match casing styles without extra add-ons.
More In-Stock Picks You Can Add to Your Order
- Armani Exchange Men’s Sneakers
- Triple-Sided Ultra-Fine Soft Bristle Toothbrush for Enhanced Oral Health
- Universal Car Steering Wheel Phone Mount for Safe Navigation
FAQ
What size tube should be used for different sausage types?
Use the small tube for thin casings and breakfast-style links, the medium tube for standard fresh links, and the large tube for thicker sausages and larger casings. Matching the tube to the casing reduces tearing and helps the mix flow evenly.
How can air pockets be reduced while stuffing sausage?
Pack the canister firmly to eliminate gaps, prime the tube before sliding on the casing, and stuff with steady pressure instead of start-stop bursts. After stuffing, prick any visible bubbles with a sterile pin to release trapped air.
How much sausage mix fits in a 3L canister?
A 3L canister is sized for practical batch cooking—enough to make multiple meals’ worth without feeling commercial or bulky. The exact amount varies with the mix’s density and ingredients, so filling in manageable portions helps keep everything cold and consistent.
Recommended for you


Was this article helpful?
Yes
No








Leave a comment