-
Shop
- Advanced Technologies
- AI Skills for Creators & Freelancers
- AI Client Management
- AI Ethics
- AI Mindset
- AI Tools & Prompts
- AI Writing & Content Creation
- Audio, Voice & Music
- Design & Visual Creation
- Email, Messaging & Communication
- Freelancing & Business
- Marketing, Ads & Conversion
- Productivity, Workflow & Automation
- SEO & Search Optimization
- Social Media Content & Growth
- Strategy, Planning & Analytics
- Video Creation & Editing
- AI Skills Mastery 2026 Collection
- Bathroom
- Best-Sellers
- Car Accessories
- Confidence
- Dating & Social Skills
- Digital Resources
- Easter Products
- Education & Learning
- Family & Parenting
- Fashion
- Fashion Accessories
- Furniture
- Gadgets
- Health & Beauty
- Health & Wellness
- Home & Garden
- Home Electronics
- Home Supplies
- Jewelry
- Kids & Babies
- Kitchen
- Lighting
- Patio, Lawn & Garden
- Personal Growth
- Pet Care
- Pet Supplies
- Pets
- Shoes
- Smart Home Living Guides
- Sport & Outdoors
- Stress Relief & Relaxation
- Super Deals
- TikTok Growth & Monetization Mastery
- Travel
- Travel & Adventure
- Wealth
- Wellness
45,000 RPM Cordless Nail Drill: LCD Setup, RPM & Care
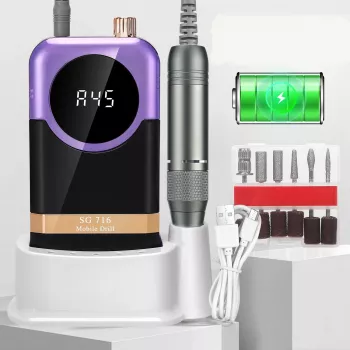
45,000 RPM Rechargeable Nail Drill Machine with LCD Display & Nail File Kit: Setup, Use, and Care
A high-speed rechargeable nail drill can make shaping, smoothing, and product removal faster and more consistent—when it’s set up correctly and used with the right bit and pressure. This guide walks through what comes in a 45,000 RPM cordless drill kit with an LCD screen, how to use it safely on natural nails and enhancements, and how to keep the handpiece and bits performing well over time.
What’s Included and What Each Part Does
- Rechargeable drill unit: Houses the motor and battery, with speed control for gradual ramp-up and better precision.
- LCD display: Lets you check your RPM setting at a glance so you can repeat consistent speeds across steps.
- Handpiece: Designed for continuous use; keep airflow paths unobstructed and avoid blocking vents during long sessions.
- Nail file kit (assorted bits/bands): Covers common services like shaping, surface refinement, and removal tasks.
- Charging components: Fully charge before first use to help maintain stable output and reduce power dips.
Common Bit Types and Best Uses
| Bit type | Best for | Suggested RPM range | Key technique note |
|---|---|---|---|
| Sanding band (fine/medium) | Surface smoothing, shortening enhancements | 8,000–18,000 | Keep moving; avoid staying in one spot to prevent heat |
| Ceramic or carbide barrel | Bulk removal of gel/acrylic | 15,000–30,000 | Use light pressure; let the bit do the work |
| Tapered cone | Sidewalls and near cuticle area on enhancements | 6,000–15,000 | Work at a shallow angle; avoid contact with skin |
| Flame/needle (fine) | Detail cleaning around edges | 4,000–10,000 | Very light touch; short passes only |
| Buffer/polisher | Final refinement and shine steps | 3,000–7,000 | Lowest effective speed for comfort |
Getting Started: Charging, Bit Installation, and First Power-On
- Charge fully before the first session: A full charge supports steadier torque and smoother performance. Avoid using the device while charging unless the manufacturer explicitly supports it.
- Inspect before inserting the bit: Dust on the bit shank or inside the chuck can cause wobble, extra vibration, and uneven filing.
- Insert to the correct depth: Don’t force the bit to the bottom if the design calls for a small gap. Lock the chuck securely so the bit can’t shift under load.
- Test at low speed first: Start at a low RPM, confirm smooth rotation with no vibration, then increase gradually to your working range.
- Switch directions safely: If the drill supports forward/reverse, stop rotation before switching to reduce stress on the handpiece.
Speed and Pressure: Practical Settings for Common Services
The safest approach is to select the lowest RPM that still cuts efficiently, then rely on steady movement rather than force. High RPM paired with pressure is what creates heat spikes, chatter, and accidental thinning—especially on natural nails.
Suggested Starting Points by Task
| Task | Starting RPM | Increase to (if needed) | Stop when |
|---|---|---|---|
| Natural nail surface refine | 4,000 | 7,000 | Nail plate looks evenly matte (not thinned) |
| Gel polish debulk | 10,000 | 18,000 | Color layer is thin and even |
| Acrylic debulk | 18,000 | 30,000 | Product is reduced near base; switch to finer bit |
| Shaping enhancement free edge | 8,000 | 15,000 | Shape is crisp with minimal heat |
| Detail around cuticle on enhancement | 5,000 | 10,000 | Area is clean without redness or sensitivity |
LCD Display: How to Use It to Stay Consistent
Cordless Workflow: Battery, Portability, and Session Planning
- Start full for longer services: A steady battery level helps maintain consistent torque. Instead of running to empty every time, charge on a schedule.
- Give the handpiece micro-breaks: Short pauses during long removal sessions can reduce heat buildup and help extend motor life.
- Control dust: Fine filing dust can settle into seams over time. Keep your station clean and consider general ventilation best practices outlined by OSHA guidance on ventilation.
- Travel-ready habits: Pack bits in a closed case and wipe down the handpiece after each appointment to limit dust ingress.
Cleaning and Maintenance for Long-Term Performance
For broader nail product safety considerations, the U.S. FDA’s nail care product safety information is a helpful reference.
Quick Troubleshooting
| Issue | Likely cause | Fix |
|---|---|---|
| Bit wobble | Bit not seated/locked or debris in chuck | Remove bit, clean chuck, reinsert and lock securely |
| Heat on nail | Too much pressure, RPM too high, dull bit | Lower RPM, lighten pressure, switch to sharper/finer bit |
| Handpiece vibration | Bent bit, worn bit, or imbalance | Replace bit; confirm correct size and proper installation |
| Power drops under load | Low battery or excessive pressure | Recharge and reduce pressure; work in passes |
Product Snapshot: 45,000RPM Rechargeable Nail Drill Machine with LCD Display & Nail File Kit
View product: 45,000RPM Rechargeable Nail Drill Machine with LCD Display & Nail File Kit
(In stock, $44.51 USD)
More In-Stock Essentials
- Triple-Sided Ultra-Fine Soft Bristle Toothbrush for Enhanced Oral Health (In stock, $1.52 USD)
- Universal Car Steering Wheel Phone Mount for Safe Navigation (In stock, $1.80 USD)
FAQ
Is 45,000 RPM too fast for natural nails?
45,000 RPM is a maximum capability, not a required working speed. Natural nails typically need low to moderate RPM with gentle pressure and constant motion to prevent heat and thinning.
How should the drill be used to remove gel polish without damaging the nail?
Use a moderate RPM to break the top coat, then debulk the color while keeping the bit moving. Reduce RPM as you get close to the base coat, stop before reaching the natural nail, and finish any remaining product gently with a hand file or buffer.
Why does the handpiece get hot or start vibrating?
Common causes include too much pressure, using a high RPM for the task, a dull or bent bit, or dust inside the chuck. Stop, check installation, clean the chuck, and switch to a sharper or properly balanced bit before continuing.
Recommended for you

Was this article helpful?
Yes
No









Leave a comment